Showing posts with label windows. Show all posts

Saturday, July 2, 2011

Little things

The past few days have been all about getting the smaller things done, like the last door going in, drywall completely mudded and sanded, and getting the last of the stuff out of our apartment. Today, we textured the walls. While it would have been easier/cheaper to not use texture, it does cover a multitude of sins, and we like the inside looking as conventional as possible. 


Here are some pictures of the slider going in, and of the only measuring mistake so far--- we were off by 1/4", and it was remedied by removing a 1/2" OSB spacer...and shaving some off with a saws-all. Alan's uncle, Mr. Chick Bowdrie, is also helping us now. We are very, very grateful for all of the help we've had from family, this would be impossible without them. 


Mudding....a lot of it.


The slider is unloaded from the tractor. 


And does not slide into place. So we remove the spacer, and give it a little shave.


All done. The final sealing of all gaps and cracks comes in a few days. 


It was 105 degrees today, so we decided to tape the windows shut. While we were at it, we figured we'd spray some texture..


Taping and sanding. Yes, the floor is a mess...

 And it goes on. I was in charge of the 'knockdown' part of texturing, so if it's terrible, you know who to blame...
Oh wait, nevermind, it's gorgeous.

Monday, June 27, 2011

Doors, windows, and drywall

Windows and the front door are in, and the drywall is almost done, and it makes it look so much different! I am incredibly excited. Expect fewer updates for a while, as Alan and I have to move out of our apartment...something we've been neglecting in favor of building the conex. 


The ikea kitchen setup stations-- 5 cabinets, grouped by parts that belong to them. They missed one set of drawer fronts, that Alan went and got today. This may have been a very stupid idea...

Thursday, June 23, 2011

A porch is born

Wow, It's been a while since I've updated. It's because we had a LOT of work to do, and lot of long days. I'm going to break this up into two updates: one detailing all of the fabrication that's been done, and one for what happened today.
The big issue we were working on is the porch. For the sake of awesome, we decided to cantilever it. For the community skill set we have, this means steel. Quite a bit of it. We also needed to finish the window and door frames (fabrication and placement), the skylight, vent holes and pipes, and lay out the wiring and outlet/switch placement. Paul the contractor did the electrical and it's pretty much like magic, and it's all officially done today. The reason we needed to finish all of the welding is.... we get insulation tomorrow! And since Alan has already started a kitchen fire with a welder, we really don't want to catch our insulation on fire. It's just a smidge toxic. In addition to that, I took a bad trip and landed poorly, and have been too busy pitying myself and poking my bruises to update. Also, you'll be able to see why we ran over budget..

Without further delay...a porch. My dad was able to come down to help us with part of this, which was super exciting!


The deck of the porch consists of 50" 3"x3" square stock spaced every four feet. You can see most of them tacked on here, with part of our outdoor
storage/water heater wall being placed on the end.


Alan Sr. and my dad work on the roof supports/wall of the water heater closet


The first of the uprights, awning supports, and handrail.


The rest of the uprights, awning supports, and handrail. Alan and his dad were up until 4:30 this morning getting this welding finished.


Here's Alan welding the window frame in. Can you tell what he's doing wrong? The answer will
be at the end of this update.


Our end cap wall is in place now! It really gives the whole thing a sense of what it's really going to look like.


As for the little test...Alan is welding without a jacket, meaning this happened. Don't be stupid like Alan, it hurts. These are U.V. burns from the arc AND blisters (hard to see) from stuff popping while welding.

Saturday, June 11, 2011

Spent lots of money today!


Alan hanging out with our new neighbors, the goats.


Today we had our only actual contractor come out, as he is the one doing the electrical and plumbing. He did work on the big house on the property, and is familiar with the layout of the utilities and things like that.

We had a not-brief moment where it was unknown if the gauge of wire we needed to run (6) for the 220 appliances would fit in the existing conduit. The run is going to be almost 180' in one direction, so there's no way we could go with smaller wire (you lose voltage over distance, and could end up shutting off your computer every time your fridge kicked on if you wired things poorly). What we're going to have to do is pull out the existing wire, then re-run the whole thing in order for it all to go. So, my advice...do this from scratch, or use 1" conduit everywhere instead of 3/4"!


Alan unveils one of our piers while standing in our utility trench.


All of our piers are poured, and conduit laid out. I made it a goal to ha
ve a different dog in every picture, so let's see if I can do it!


This is what we spent money on today. Top to bottom: Medicine cabinet/mirror, pocket door, pocket door frame, and shower pan. Back left is the wire (almost $300 by itself..), and a pipe for..some reason. We also picked up the vent fan for the bathroom and a light fixture. The budget in the sidebar has been updated! We're definitely going to go over the 4k mark, but it's not a matter of necessity. We're just making things a little nicer/over-engineered than we need to, and that's going to cost. Luckily, since it's going on Alan Sr. and Marie's property, they're helping us with the stuff that they're asking for (like a carport, and how we're doing the deck).


The door and window frames are tacked into place, and we're ready to start building up the bathroom tomorrow. We're having to wait on our welder to do a lot of things, unfortunately.


This is the end stud wall and the steel end cap wall (two 4'x10' sheets that will be welded together and trimmed). The stud wall isn't done yet, it still needs fireblocks. Alan built this buy himself, as I was very sick that day. To the right is some of the steel for the window frames.


Sunday, June 5, 2011

It's a frame-up


All (mostly) of the windows and doors cut out. Bathroom window and the cutout for the swamp cooler are still to go.


Here's our window frames. Since we're cutting out a lot of the strength in the walls, we need to add it back in!
The rough-ins were plasma cut out, then we used an angle grinder on them to smooth out the cut edges and finish the sizing.


Then we hoisted the windows onto a rolling scaffold, then into the frames to test fit them.


The next phase starts, which involved welding tabs to the interior wall for the studs, and a little bit of exterior cleanup.


Here's how we're doing the wall studs:
They're then bolted to an angle piece welded to the container.


Once the studs went up...it started looking like a real house, really quick. Here's the start of the ceiling supports and the fire blocks. Tomorrow we're pouring more concrete, and on Tuesday we are building the end cap wall!

Thursday, May 26, 2011

This dude cut some big honkin' holes in our house!

Paul is our awesome awesome welder guy. This is what Paul did.


First, we laid out (very roughly) where doors and windows would go. 46" from the floor, then a 36" window.


Then we (Alan) cut all of the crap off of the outside (these were used as storage racks for building material)


Once the exact window placement was decided, the windows were more accurately laid out and squared. This was done by first measuring the rough opening, then putting a mark on the wall. The marks were then squared by the Pythagorean theorem (working with mathematicians means we do things the weird way), and a pop rivet was poked through the wall at each outside corner of the window.

This meant that we had an exact measurement on th
e outside by which to draw the cutting guidelines.


Then Paul came over. This picture is the only one I really have of him cutting the main bits, because any time we're working directly with the surface of the container in a way that might involve atomized paint (welding, cutting, grinding), you need to wear a respirator with a HEPA "P100 filters [which] provide a 99.97% efficiency level for removing particles sized at 0.3 microns or larger". There's some nasty stuff in there you really don't want to breathe. And I left mine at home.


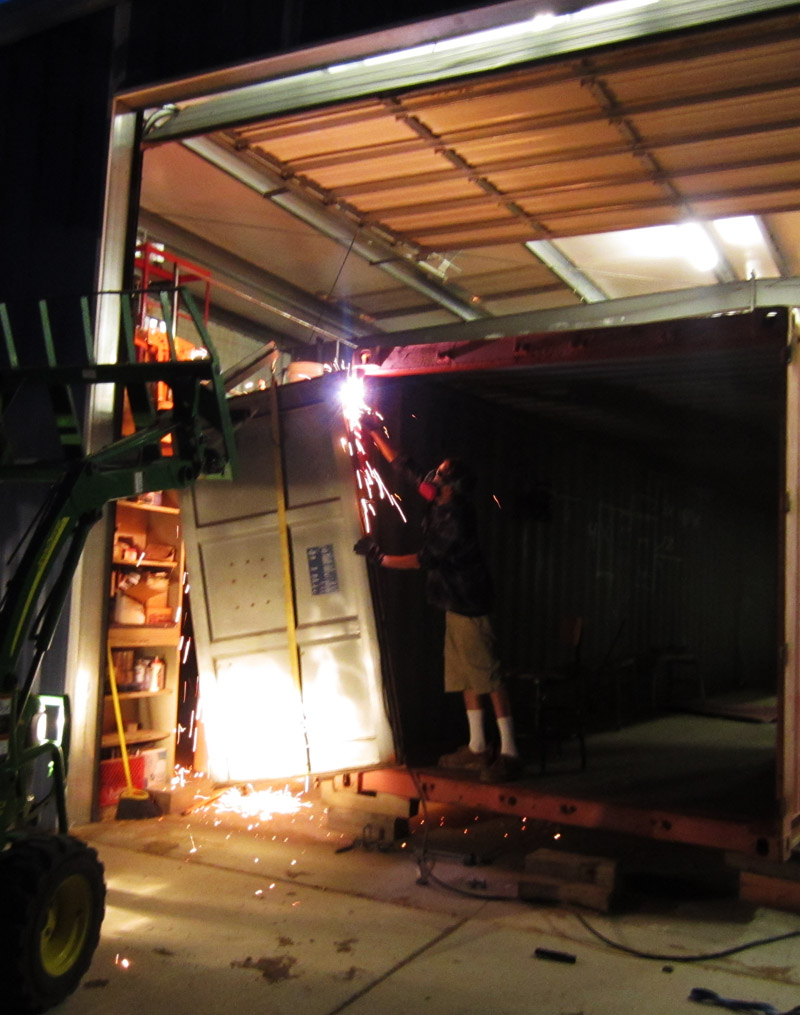
The doors come off:
 

I apologize for the pictures being so terrible, by my little point and shoot camera was not happy trying to deal with all of the light from the plasma cutter and all of the
dark from the fact that it was 10pm.


We have windows! It makes it look so much smaller for some reason.


At the end of all of this I'm probably going to do some posts with the nicer pictures I've taken that don't really further the explanation of construction.