Saturday, June 11, 2011

Spent lots of money today!


Alan hanging out with our new neighbors, the goats.


Today we had our only actual contractor come out, as he is the one doing the electrical and plumbing. He did work on the big house on the property, and is familiar with the layout of the utilities and things like that.

We had a not-brief moment where it was unknown if the gauge of wire we needed to run (6) for the 220 appliances would fit in the existing conduit. The run is going to be almost 180' in one direction, so there's no way we could go with smaller wire (you lose voltage over distance, and could end up shutting off your computer every time your fridge kicked on if you wired things poorly). What we're going to have to do is pull out the existing wire, then re-run the whole thing in order for it all to go. So, my advice...do this from scratch, or use 1" conduit everywhere instead of 3/4"!


Alan unveils one of our piers while standing in our utility trench.


All of our piers are poured, and conduit laid out. I made it a goal to ha
ve a different dog in every picture, so let's see if I can do it!


This is what we spent money on today. Top to bottom: Medicine cabinet/mirror, pocket door, pocket door frame, and shower pan. Back left is the wire (almost $300 by itself..), and a pipe for..some reason. We also picked up the vent fan for the bathroom and a light fixture. The budget in the sidebar has been updated! We're definitely going to go over the 4k mark, but it's not a matter of necessity. We're just making things a little nicer/over-engineered than we need to, and that's going to cost. Luckily, since it's going on Alan Sr. and Marie's property, they're helping us with the stuff that they're asking for (like a carport, and how we're doing the deck).


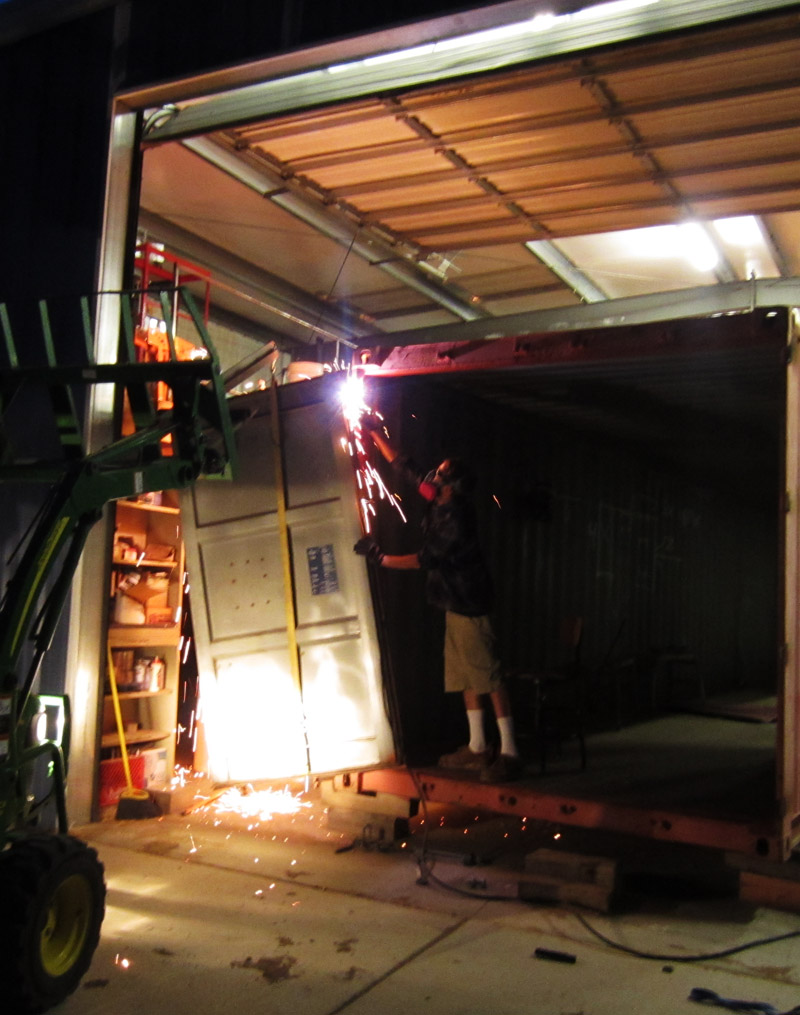
The door and window frames are tacked into place, and we're ready to start building up the bathroom tomorrow. We're having to wait on our welder to do a lot of things, unfortunately.


This is the end stud wall and the steel end cap wall (two 4'x10' sheets that will be welded together and trimmed). The stud wall isn't done yet, it still needs fireblocks. Alan built this buy himself, as I was very sick that day. To the right is some of the steel for the window frames.


Sunday, June 5, 2011

It's a frame-up


All (mostly) of the windows and doors cut out. Bathroom window and the cutout for the swamp cooler are still to go.


Here's our window frames. Since we're cutting out a lot of the strength in the walls, we need to add it back in!
The rough-ins were plasma cut out, then we used an angle grinder on them to smooth out the cut edges and finish the sizing.


Then we hoisted the windows onto a rolling scaffold, then into the frames to test fit them.


The next phase starts, which involved welding tabs to the interior wall for the studs, and a little bit of exterior cleanup.


Here's how we're doing the wall studs:
They're then bolted to an angle piece welded to the container.


Once the studs went up...it started looking like a real house, really quick. Here's the start of the ceiling supports and the fire blocks. Tomorrow we're pouring more concrete, and on Tuesday we are building the end cap wall!

Thursday, May 26, 2011

This dude cut some big honkin' holes in our house!

Paul is our awesome awesome welder guy. This is what Paul did.


First, we laid out (very roughly) where doors and windows would go. 46" from the floor, then a 36" window.


Then we (Alan) cut all of the crap off of the outside (these were used as storage racks for building material)


Once the exact window placement was decided, the windows were more accurately laid out and squared. This was done by first measuring the rough opening, then putting a mark on the wall. The marks were then squared by the Pythagorean theorem (working with mathematicians means we do things the weird way), and a pop rivet was poked through the wall at each outside corner of the window.

This meant that we had an exact measurement on th
e outside by which to draw the cutting guidelines.


Then Paul came over. This picture is the only one I really have of him cutting the main bits, because any time we're working directly with the surface of the container in a way that might involve atomized paint (welding, cutting, grinding), you need to wear a respirator with a HEPA "P100 filters [which] provide a 99.97% efficiency level for removing particles sized at 0.3 microns or larger". There's some nasty stuff in there you really don't want to breathe. And I left mine at home.


The doors come off:
 

I apologize for the pictures being so terrible, by my little point and shoot camera was not happy trying to deal with all of the light from the plasma cutter and all of the
dark from the fact that it was 10pm.


We have windows! It makes it look so much smaller for some reason.


At the end of all of this I'm probably going to do some posts with the nicer pictures I've taken that don't really further the explanation of construction.


Sunday, May 22, 2011

Discussions

Unfortunately the past few days have been a hibernation period of sorts. We went and bought doors and windows (one 5' sliding patio door, one 36" front door with an opening window, 3 4'x3' horizontal opening windows, and a bathroom window), and talked to our 'welding guy' Paul. While Alan and Alan Sr are competent welders, Paul is an incredibly professional perfectionist, and will be framing in the doors and windows, as well as doing the basis for the roof and porch.

Today the guidelines for the windows are being laid out by Alan Sr while Alan and I...study for finals. Paul will be over on Wednesday to start, so I should have some pictures and more detailed on how we're doing the windows soon.

The framing will probably be done by the end of next week(?) as with the plumbing. We may move the container early so as not to risk damaging anything. I'm calling sprayfoam contractors tomorrow to get bids on that as well.

Friday, May 20, 2011

Lots of words

I've been linked to on a yahoo group, and they had some quetions about the insulation. So I guess I'll repost it here, and it's long...

"Hi guys! Sorry this is so long...

Well, the main way we're going to avoid it is with building/window placement, and a small swamp cooler. After all, it's only 320 sqft-- It doesn't take that much to cool (or heat) that space, and you don't need to keep it arctic in the summer- just livable. For us, this has been 80 degrees in our current apartment.. Feels downright balmy if you step outside and it's 110!

But we will also have an average of R16 insulation (polyurethane spray foam) in the walls (due to the ins and outs, some will be r21ish and others r12, an additional r5 thanks to insulated sheathing. Total of r21-- r15 is what's recommended for new construction here, both wood and metal framing "wall cavities" . The only downside to this is we do lose some floor space.

The building is going to be oriented lengthwise N/S. This is the opposite of what you would do to passively solar heat a home. There will only be one window on that end, further reducing the direct effects of sun getting in the house. The east end will be partially covered by an awning over the porch, meaning that sun won't hit the walls of the container for most of the day.

We went with the piers partially in order to better insulate the bottom--we also did it this way so that the piers can cure while we construct the inside of the container, and then just pop everything together, instead of having to wait a month to set the container then start work. When everything's placed and finished, there will be concrete knee walls on all four sides, with a door for access under the container. The air under the container won't change in temperature much, and it gives us the ability to slide on under there and spray foam the heck out of it. Sprayfoam insulation has an r-value of 6 per inch, more depending on the application technique and formula.

As far as the roof goes, we will be putting a "party deck" up there (read: you can walk on it and not be walking on your ceiling), which will be 6" above the roof of the container. For now, we're leaving the outside uninsulated. The inside will also be spray-foamed and sheathed, probably to the depth of 6-8" (r-value 49). This also allows us to build out the inner ceiling for can lighting. As that's going to be the largest part of the container receiving direct sun until the late evening, we will have the option of insulating under the party deck as well if it becomes an issue.

All of this will add up to a perfectly normally insulated home for this area, and the placement will help a great deal. It will also mean we can pretty much heat it with a match in the winter!

As far as the other concerns-- It's not going to look like a steel box from the inside, I promise! It will utterly conventional (..if decorated by people who are a little weird), just small. The only thing we're leaving original is the wood floor. It's going to have the heck sanded out of it and be varnished like crazy. We're putting in nice, big windows and will have plants on the patio, and if I can get out from under this massive pile of research papers any time soon, a veggie garden. The outside is going to be painted blue with white trim like the shop on the property so everything matches.

This is going to sound so cheeseball, but..happiness for us is a place where we can be around one another, be safe, and have the few things we love with us. That's our dog, our cats, our hobbies, and not much else. We'll have plenty of room to go on walks and rabbit hunts with the all the dogs, plenty of room for my knitting/sewing things, and enough room for books.

What enables us to do it that's a little 'unfair'-- it's going on someone else's property. There's the biggest cost, and we don't have to pay it. We're hooking into existing septic and an existing well.If we had to do this from scratch, there's no way in heck we could afford it. Ideally, people who were interested in container living could by a biggish plot of land (3-5 acres), everyone chips in for well, septic/sewer, the costs of getting power to every lot, etc and puts in a container community. The odds of getting something like that approved by your city are slim to none, though, which is quite sad. Most of these buildings are considered too small to be habitable, and can actually be condemned if found by the city. It says a lot to me that "we" can't consider a safe, insulated building with running water, a toilet, and a full kitchen to be okay to live in-- and it's not like you have to look to a third-world country to see others living with far, far less. Look to reservations, and rural Appalachia. But the permitting system is a WHOLE 'NOTHER Rant..

--Rachel"

Wednesday, May 18, 2011

Stress


I've been glossing over the stressful parts of this build (already!), because I really don't know how to write about it.

It's mainly been an issue of too many cooks, I think. Which is appropriate, because the main issue has been the layout of the kitchen (and to a lesser extent, the bathroom). Our goal is to minimize the length that the kitchen takes up in order to give us more room in the living room and bedroom. This meant a galley kitchen with no countertops on the short end of the container-- saving us 2 ft in length at a minimum.

The argument against this is that we are 'wasting' that 7' of space on that wall.

The other issue has been one for me-- I have a bum knee (multiple dislocations, fractured patella, torn/obliterated meniscus, and a lateral release, 2 screws, in April '04) and needed to design everything with mobility in mind. This means doorways, hallways, and the bathroom need to be navigable on crutches or with a cane, in case I do something stupid and hurt myself again (last time I hurt my knee was a few weeks ago, and as far as I can figure, I did it in my sleep and crippled myself for days).

The final final final plan is going to be hashed out tonight, as we are buying windows this week and cutting holes in the container to place them. The general layout is fixed, it's just fine-tuning the kitchen and bathroom (vanity v.s. wall sink, fridge size, some issues with pet supplies storage, window size and placement). We also have to find the smallest sliding glass patio door possible for emergency egress in the bedroom without torpedoing our wall space.

There have been some squabbles amongst the design team (Alan Sr, Marie, Myself, and Alan) over the kitchen, because the younger set wants to go very modern open shelving, modular workspace style-- whereas Alan Sr and Marie are leaning more traditional overhead cabinets, built-in kitchen, possibly u-shaped.

On a lighter note: this is my favorite house ever. I would copy it exactly if I could-- love the kitchen, love the teal in the bedroom with all my heart.

--Rachel

Monday, May 16, 2011

First Leg

The conex was moved today into the shop where everything will be finished. The windows will be roughed in, but not installed until the container is on the piers. Aside from that, it will be ready to go the moment it's in the final spot.

The guys who moved it were amazingly skilled, and made it look damn near easy. Not that I'd ever volunteer to move one, of course..

Not much more to say, but lots of pictures and video of the final touchdown.

The container was put up on temporary blocks to better allow the truck to get under it.


First, they winch the leading end of the container up, then move the blocks around so they can drop the tail end of the trailer underneath.


Then a roller is placed under the container, the tail end is angled up, and the container begins to be winched into place. They alternate between rolling the container forward and lifting the tail end of the truck to reposition the roller.


Liftoff! It only took about 15 minutes to get the container completely on the truck.


Now the hard part.


It fits!


Getting it off of the trailer is the same as getting it on, just in reverse. Simple...except these guys were doing it with 5'of clearance in the back, and about 3' on one side. And they did it beautifully! It was VERY noisy and nerve-racking though. The shop cat was quite upset about all of the fuss.


Somewhat anticlimactic video: http://www.youtube.com/watch?v=bmgOFGakMlE


Fortunately, there was nothing interesting underneath the container in it's old resting spot.


Nothing living, at least...